
How to check what is issue of Blue Screen
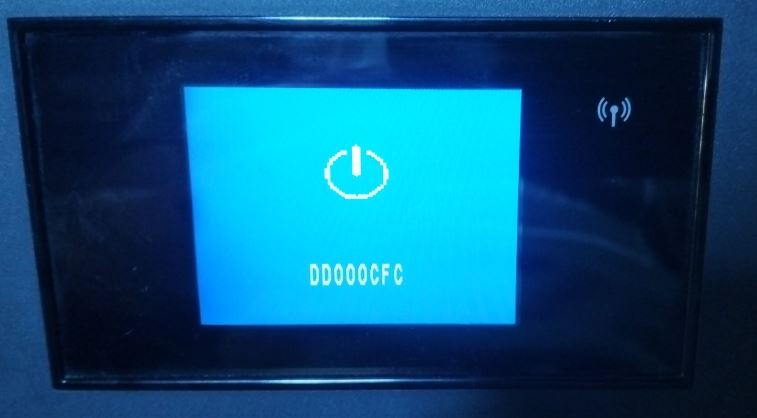
The blue screen issue seems to be related to an error during the initialization process. It may occur when the board fails to read the required initialization data, or when the data is read successfully but cannot be properly saved to the board's memory.
I think this is similar to a computer that cannot boot because its Windows operating system is corrupted. In the same way, if the board's firmware or operating system is corrupted, the board may fail to boot properly.
It could also be similar to a computer having a boot error due to poor contact between the RAM module and its socket.
Therefore, the blue screen may be caused by a problem with the initialization data, the board's memory, or the firmware. Further testing is needed to identify the exact cause.
Tools Required for Testing: A Separate LCD Display and a New Flex Cable
Blue Screen Issue – Troubleshooting and Repair Procedure
1. Possible Causes of the Blue Screen Issue
A blue screen on the printer may be caused by any of the following issues:
-
Defective Scanner Flex Cable – The scanner flex cable may be worn out, damaged, or defective, resulting in a poor connection.
-
Corroded Scanner Flex Cable Connector Slot – Corrosion on the connector slot pins may prevent proper contact between the scanner flex cable and the connector.
-
Defective Logic Board – The logic board may have a firmware-related issue that requires a firmware update or reinstallation.
-
Defective Other Flex Cables – Other flex cables connected to the printer may be damaged or defective, causing the blue screen issue.
2. Troubleshooting Procedure
Follow the steps below to identify the cause of the blue screen issue.
Step 1: Initial Setup
-
Turn off the printer.
-
Connect all required wire cables.
-
Connect the control panel flex cable.
-
Connect the power switch flex cable.
-
Turn on the printer.
Check the display:
-
If the blue screen appears: Proceed to Step 2.
-
If the blue screen does not appear: Proceed to Step 3.
Step 2: Check the Logic Board
If the blue screen appears after connecting the initial cables, the logic board may have a firmware-related issue.
Solution:
-
Update or reinstall the logic board firmware as required.
-
After completing the firmware update, return to Step 1.
-
Repeat the initial setup and verify whether the blue screen issue has been resolved.
-
If the blue screen no longer appears, proceed to Step 3.
Step 3: Check the Other Flex Cables
-
Turn off the printer.
-
Disconnect the power supply before handling the internal connections.
-
Connect the remaining flex cables, excluding the scanner flex cable.
-
Turn on the printer.
Check the display:
-
If the blue screen appears: One of the connected flex cables may be defective.
-
If the blue screen does not appear: Proceed to Step 4.
Solution if the blue screen appears:
-
Check the connected flex cables according to their respective cable codes.
-
Inspect the cables and connectors for damage or poor connections.
-
Repair or replace the defective cable as necessary.
-
Return to Step 3 and repeat the test to confirm that the issue has been resolved.
-
Once the blue screen no longer appears, proceed to Step 4.
Step 4: Check the Scanner Flex Cable
-
Turn off the printer.
-
Disconnect the power supply before handling the internal connections.
-
Connect the remaining flex cable, which is the scanner flex cable.
-
Turn on the printer.
Check the display:
-
If the blue screen appears: The scanner flex cable or its connector slot may be defective. Proceed to Step 5.
-
If the blue screen does not appear: The blue screen issue may have been resolved. Proceed to Step 6.
Step 5: Inspect and Repair the Scanner Flex Cable or Connector Slot
If the blue screen appears after connecting the scanner flex cable, perform the following checks.
Solution A: Defective Scanner Flex Cable
-
Turn off the printer and disconnect the power supply.
-
Inspect the scanner flex cable for wear, damage, or defective contact points.
-
If the cable is worn or damaged, trim the affected end only if the cable design and remaining length allow it. Otherwise, replace the cable.
-
Reconnect the scanner flex cable.
-
Return to Step 4 and repeat the test.
-
If the blue screen no longer appears, proceed to Step 6.
Solution B: Corroded or Defective Scanner Flex Cable Connector Slot
-
Turn off the printer and disconnect the power supply.
-
Inspect the scanner flex cable connector slot for corrosion, damaged pins, or poor contact.
-
Clean the connector slot using an appropriate electronics-safe cleaning method.
-
Check the pins to ensure they are not damaged or heavily corroded.
-
If the connector slot is defective and requires replacement, have a qualified technician desolder the damaged slot and solder a replacement connector.
-
After completing the repair, return to Step 3 and repeat the troubleshooting procedure to verify the connection.
-
Continue testing until the blue screen issue is resolved.
Step 6: Final Verification
-
Ensure all flex cables and wire connections are properly installed.
-
Check that all repaired or replaced components are securely connected.
-
Turn on the printer.
-
Verify that the display operates normally without showing a blue screen.
-
Perform a functional test to confirm that the printer and scanner operate correctly.
Expected Result: The printer starts normally, the blue screen does not appear, and all connected components function properly.
Important Safety Reminder: Always turn off and unplug the printer before connecting, disconnecting, cleaning, or repairing internal cables and connectors. Firmware updates and connector soldering should be performed by qualified technicians using the correct procedures for the printer model.
Add Comment